After completing the instructions in
Assembling a SMIB System, you should have a SMIB folder inside your working
directory.
SMIB_Example at the same level where the
SMIB folder is located.models below your new SMIB_Example folder.SMIB folder
below the previously added models folder.pf2rec folder
from Resources to
the SMIB_Example
folder.create_records.py and run_pf.py Python files one level up
(i.e., to the SMIB_Example
folder). The tree below shows how your folder structure should look
like:
C:\Users\...>tree /f /a SMIB_Example
Folder PATH listing
Volume serial number is ...
C:\USERS\...\SMIB_Example
|   create_records.py
|   run_pf.py
+---models
|   \---SMIB
|       |   ...
|
\---pf2rec
    |   create_pf_records.py
    |   generate_component_list.py
    |   gridcal2rec.py
    |   __init__.py
    |   ...
SMIB and name it
Utilities.Utilities called saveTotalSMIBModel. Remember that the
procedure for creating functions is the same as for other kinds of
classes such as Package,
Model or Record.
function saveTotalSMIBModel "Save the SMIB package as a total model"
  extends Modelica.Icons.Function;
  output Boolean ok "= true if succesful";
protected
  String targetDir = "C:/Users/Miguel/SMIB_Example/models/SMIB";
algorithm
  ok := saveTotalModel(targetDir + "/" + "SMIBTotal.mo", "SMIB", true);
end saveTotalSMIBModel;
🔨 Update the targetDir variable value
with the appropriate path to reach the SMIB folder.
📌 This function has no inputs and only one boolean output. The
modelica standard function saveTotalModel is called inside the
algorithm section with predefined arguments. You can check the
information view of saveTotalModel to get to know the
proper use of each of its parameters. To do that, make sure the
DymolaCommands library is
loaded within the Package Browser. Then navigate as shown in the
picture below
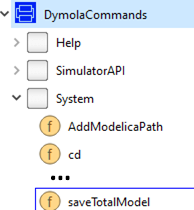
saveTotalSMIBModel function from the
Package Browser. Select the " Call Function..." option and
then click the OK button. As
a result, you should be able to see a new file called
SMIBTotal.mo in the
same folder where your model files are being stored.create_records Python script is placed
and execute it as indicated below.
python create_records.py
 ) the SMIB package.
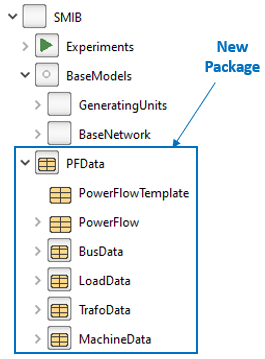
📌 The Python script create_records should have created a new
package inside your model that looks like this
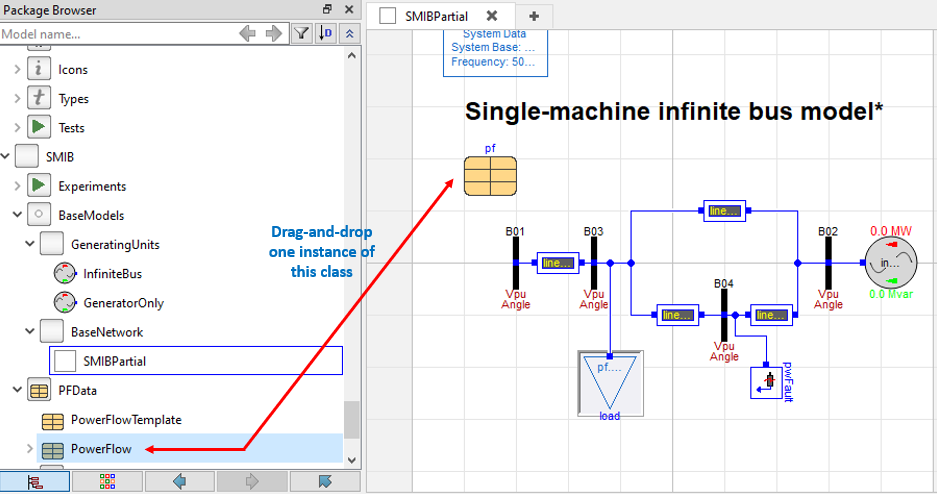
SMIBPartial model to open its diagram
view. From the new PFData
package, drag and drop one PowerFlow element on your canvas.
For convenience, rename it as pf.
| Component | V_0 | A_0 | P_0 | Q_0 |
|---|---|---|---|---|
| B01 (bus) | pf.powerflow.bus.v1 | pf.powerflow.bus.A1 | N/A | N/A |
| B02 (bus) | pf.powerflow.bus.v2 | pf.powerflow.bus.A2 | N/A | N/A |
| B03 (bus) | pf.powerflow.bus.v3 | pf.powerflow.bus.A3 | N/A | N/A |
| B04 (bus) | pf.powerflow.bus.v4 | pf.powerflow.bus.A4 | N/A | N/A |
| load (load) | pf.powerflow.bus.v3 | pf.powerflow.bus.A3 | pf.powerflow.load.PL1 | pf.powerflow.load.QL1 |
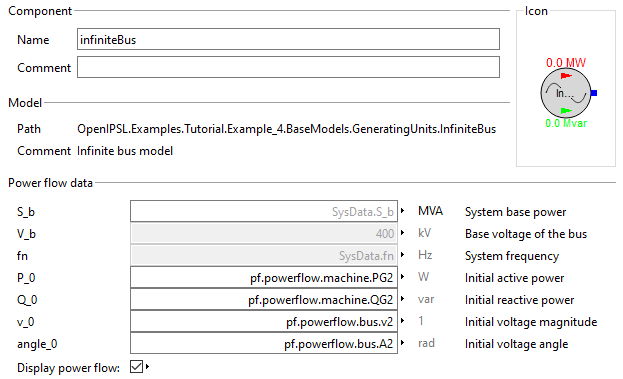
| InfiniteBus (gen) | pf.powerflow.bus.v2 | pf.powerflow.bus.A2 | pf.powerflow.machine.PG2 | pf.powerflow.machine.QG2 |
If you check your model now, you
should see an error because we have not defined the power flow
values. We have just pointed to the container which will have it.
Next, we generate the power flow results using GridCal.
Experiments package. Link
the power flow variables to genunit as specified in the following
table:
| Component | V_0 | A_0 | P_0 | Q_0 |
|---|---|---|---|---|
| genunit (gen) | pf.powerflow.bus.v1 | pf.powerflow.bus.A1 | pf.powerflow.machine.PG1 | pf.powerflow.machine.QG1 |